![[Company Logo Image]](_borders/aec_blue_short.GIF)

![]()
![]()
![]()
![]()
![]()
![]()
![]()
![]()

|
|
|
|
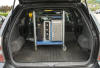
Adrienne Electronics' mBOX, Final Cut Pro, and video file servers. Get the PDF file that shows all of this info. (~5.6MB) The worst thing about post-production is capturing video. It consumes hours of unproductive time. It ties up an expensive HD deck and often an entire edit suite. Until recently, it was a necessary evil. Przyborski Productions Inc. (www.przyborski.com) is a Pittsburgh based company that produces network and regional TV commercials for clients and agencies across the country. They've been using a cost-effective, creative HDTV workflow that solves problems and increases efficiency. In 2006, director/cinematographer, Glenn Przyborski decided to build a portable video file server to use in-studio and on-location. The goal was to capture the camera's non-compressed HD-SDI video with embedded audio, plus time code. All post-production would take place from the captured files. The camcorder's videocassette recording would be relegated to the role of archiving the project. For everything to work, the captured files and corresponding videocassette recordings had to have exactly the same time code. Other benefits of recording directly to a video file server are that you're typically recording non-compressed digital video instead of capturing after the encode-decode cycle of compressed tape. On-set, you also have perfect quality, unlimited playbacks of takes for screening and reviewing by you and your clients. (Never allow your camera's master recording to be rewound and played back for simple screening purposes... it's a recipe for disaster!) Przyborski took a slightly older, dual processor, 2.5Ghz G5, added 4 gigs of ram, a Blackmagic Designs' DeckLink HD Pro video card, and a Highpoint "RocketRAID" 2220 SATA controller card. (Many Mac users aren’t aware that Highpoint Technologies offers several high performance, SATA RAID cards for OS-X. Note that if you were installing a video card and RAID controller card in a Quad G5 or the latest Intel Macs, you would purchase PCI-e versions.) A custom designed, slide-in disk drive case was fabricated to hold 8, 3.5", 500GB, SATA drives, 3 quiet fans, and a power supply. At the time, every off-the-shelf RAID drive case that could handle 8 SATA drives was too big and too heavy. The latest generation of 3.0Gb/s SATA drives are very fast and inexpensive. The eight SATA drives were attached to the PCI-X controller using flexible, 1 meter, standard SATA cables. Since the RocketRAID 2220 card has all of its SATA connectors located inside the Mac, the 8 cables were neatly plugged into the card, then passed through an adjacent card slot opening on the rear of the computer. The eight thin SATA cables then plugged directly into each of the eight disk drives. The custom case holding the drives was attached to the side of the G5 to prevent any movement that might affect the exposed SATA cables. Both the computer and RAID assembly sit on 2 inches of dense foam to cushion the shock of transportation and on-set movement.

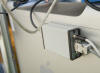
Time code has been around a long while. However, when it comes to directly capturing live SDI or HD-SDI video from a camera, a major problem pops up. Video cards from Blackmagic and AJA are designed to control a videotape machine via a DB-9, Sony protocol, RS-422 connection. Time code from the tape deck to the video card arrives as part of this serial data. At present, none of the internal SDI and HD-SDI video capture cards have a dedicated time code input. RS-422 is a bi-directional data connection. This means that there's constant communication, or handshaking between the video card and the tape deck it's controlling. For example, the card issues a command to initiate playback. The recorder responds that the command was received and that the deck is now in the play mode. Hundreds of communications take place between the deck and the video card every second. Broadcast camcorders don't use RS-422. Instead, they usually output time code on a BNC connector. An interface was necessary to convert the camera's time code signal to RS-422 data. Furthermore, this converted RS-422 signal would have to emulate a Sony tape deck. The interface would have to initiate and respond to bi-directional communications with the video capture card. Another unique requirement for the interface is that it be able to seamlessly and automatically work with time code at 23.976fps and 29.97fps. Without such an interface, the time code on the videocassette would not be the same as the time code on the captured scenes. The Adrienne Electronics' mBOX is a unique, cost effective solution to the live time code recording dilemma. The unit plugs into the 9 pin, RS-422 connection from the video card. The time code cable from the camcorder plugs into a BNC connector on the mBOX . The small unit gets it's power from one of the Mac's USB sockets. Setting up Final Cut Pro to capture non-compressed video and time code from your camera is pretty simple and straight forward. For this example, let's assume your camera is a Sony F900R and you plan to shoot 1080P at 23.976 fps. A BNC cable is connected between the camera's HD-SDI output and the HD-SDI input on the video capture card. A second BNC cable goes from the camera's time code output connector to the mBOX's time code input. The camera's time code generator should be set to "record run" and a preset time code number loaded into the generator. Usually, the hour digits of time code correspond to the cassette number. For example, videocassette #8 on a project would start with a time code of 08:00:00:00. If “free run” instead of “record run” were to be selected, the videocassette would not be able to be cued and captured under editor control unless there was at least 3 seconds of continuous time code before the desired in point. Setting up Final Cut Pro V5.1.4 for Live to Disk Recording
(please reference the FCP
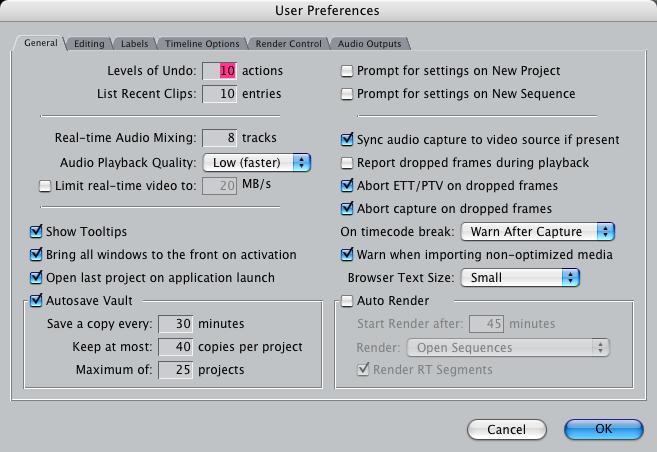
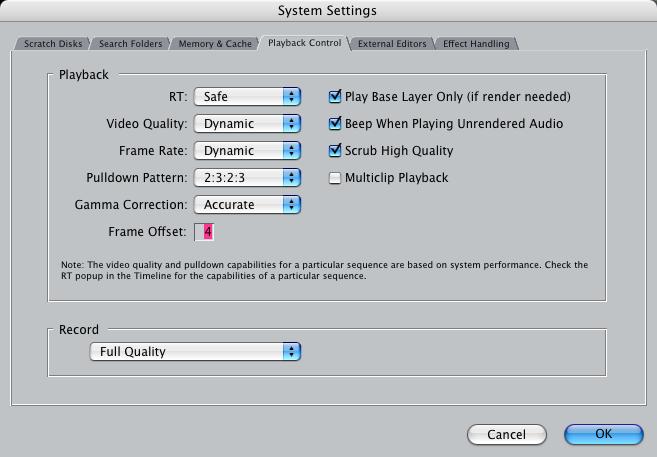
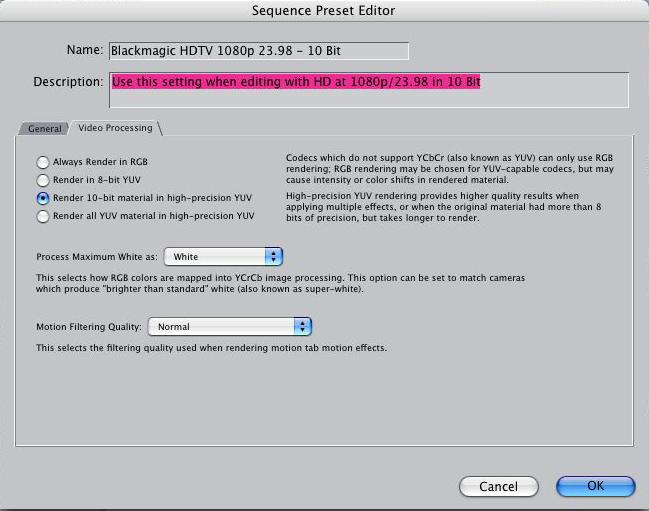
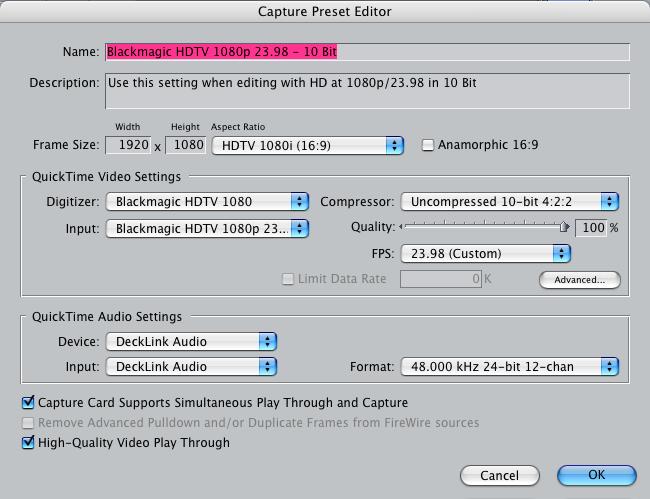
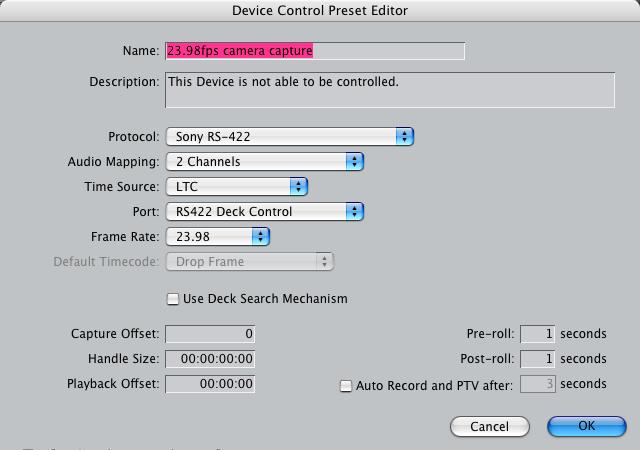
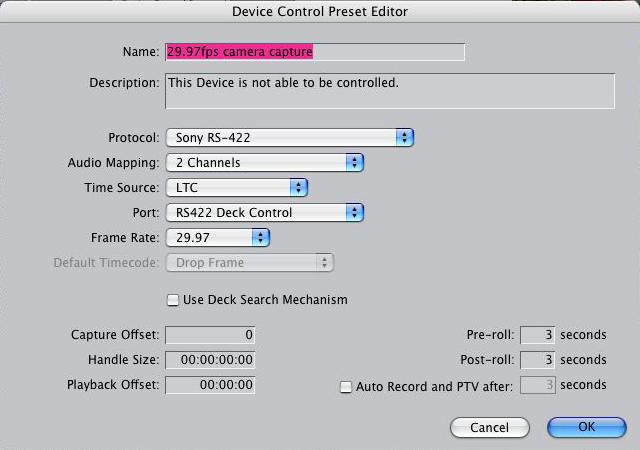
screen captures that are at the end of this page and that are also part of
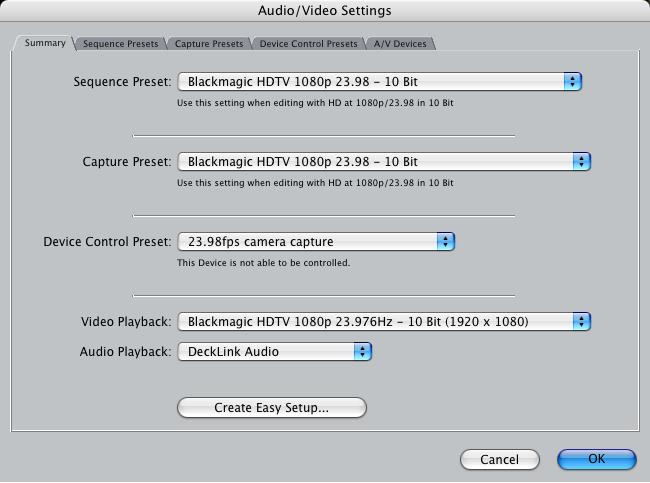
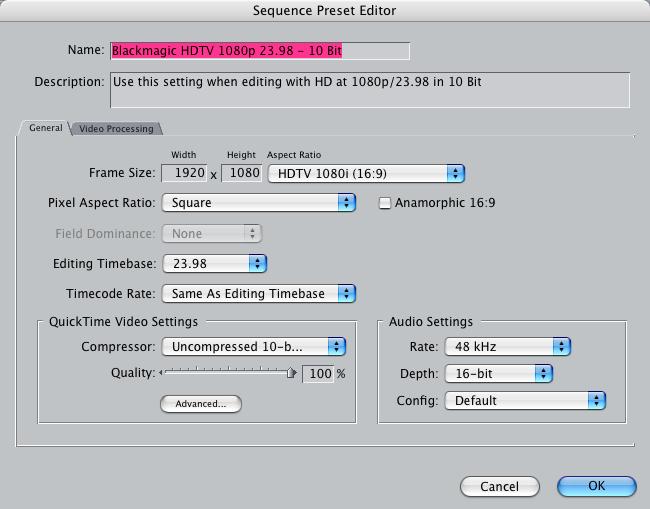
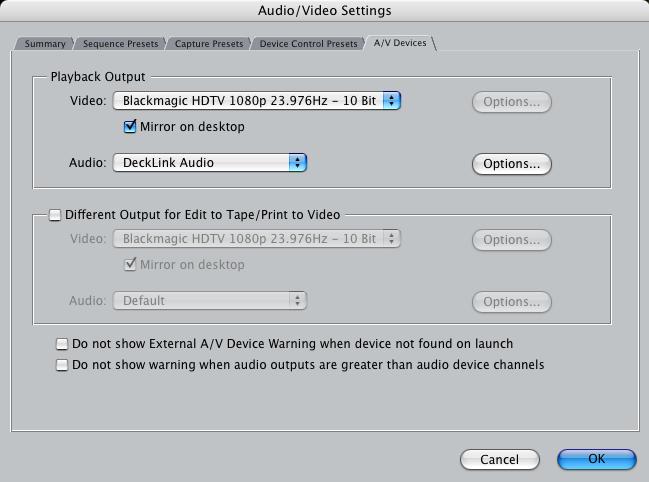
the PDF file that can be downloaded/viewed) In Final Cut Pro, under the Audio/Video Settings menu, a "sequence preset" of "1080P 23.98 - 10bit" is selected. "1080P 23.98 - 10bit" is also entered into the Capture Preset heading. For the "Device Control Preset" you must click on "Non-Controllable Device." Then, by attempting to edit this default setting, Final Cut will create a copy of the menu item. In the copy, make sure “Protocol” is set to Sony RS-422 and “Source” is LTC or longitudinal time code. For our example, “Rate” should set to 23.98. The 4th and final item in the main Audio/Video Settings menu is "Video Playback". You would typically enter the ideal or best quality format your screening monitor is capable of displaying. We use a setting of “1080P 23.976Hz - 10Bit” Many monitors can’t deal with a less than 30P frame rate. In that case, the video card has to add 3-2 pulldown to achieve a 60Hz refresh rate. Let’s assume you have everything hooked up, powered, and your FCP preferences are set as described. We’ll also assume that your RAID array is working, capable of handling the data speed requirements of non-compressed video, and the RAID array is set to be FCP’s video and audio scratch disk. (Remember, all SDI signals are non-compressed. HD-SDI data rate is about 185 MB/sec. The data rate for standard definition SDI is about 34 MB/sec.) To begin capturing live video, you first open a 1080p / 23.976 sequence. Next click on “Log and Capture.” The capture panel will open and you should see live video from your camera. If you don’t, something is wrong in your preferences or the camera isn’t outputting a video signal on its SDI output. With a blank tape in the camera, start the camera recording. You should see live video and the correct, incrementing time code in the capture window. Click “Capture Now” to begin recording to your RAID array. Press the “ESC” key on your keyboard to stop recording. To create valid video files, you must first start recording on your camera’s tape, then click the “Capture Now” button. VERY IMPORTANT: You must stop recording on the RAID before you stop recording to the camera’s tape. If you stop the camcorder first, Final Cut Pro will not create a valid QuickTime file. Failure to do this will not affect your camera’s recording, but will result in unusable files on the RAID array.
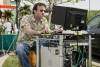
Over the past 10 months, the G5 computer, RAID assembly and AEC time code to
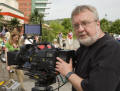
RS-422 box have proven to be very reliable during heavy use. Also added was an inexpensive, uninterruptible power source that is capable of running the computer and RAID array for 5 to 7 minutes if the power cord is accidently unplugged. Some additional production tips: For on-set and location client monitoring, we use a Dell 24 inch, 1920x1200 ”Ultra Sharp” 2407WFP LCD monitor attached to a Blackmagic Designs’ HD-Link HD-SDI to DVI interface. This Dell monitor has a lag of only 6ms and will properly display the 24P video without the need to add 3-2 pulldown, The HD-Link also allows you to calibrate the monitor’s color settings so it can pretty well match the reference monitor in your edit suite. It’s not perfect, but it’s more than adequate for on-location work. Both the LCD monitor and the HD-Link can be purchased for about $1,000. If you order this monitor, make sure to also purchase the Dell “Sound Bar” which is a small amplifier and speaker system that attaches below the monitor. Dell only charges $30 for this accessory that steals its power from the LCD monitor. You then plug the audio input of the “Sound Bar” to the analog audio output of the HD-Link. Remember, the SDI or HD-SDI signal from the camera and from your video card contains embedded audio. Make sure to establish a file naming procedure when capturing to a video file server. We’ve adopted the following format: 3 alphanumeric letters for the client, a dash, 3 numbers to represent the script’s assigned scene number, a second dash, then “TK01”. Final Cut will automatically increment the take numbers each time capture now is pressed. The complete file name of an actual scene from a recent AutoZone commercial was, “AZO-106a-TK07”. The “a” in the file name indicated an alternate version of scene 106. The script person writes this file name next to the script notes for easy identification during the edit. With consistent file naming, a director can easily locate and playback a specific take. It’s also easy to quickly put your best takes on a timeline then playback a rough edited sequence while your crew is setting and lighting the next scene. Frame rates can be confusing. 24P usually refers to 23.976 fps. Different camera manufacturers and software makers often round the number 23.976 to 23.98 even though it’s actually 23.976. 30P usually means 29.97 fps. If that isn’t confusing enough, many cameras that shoot at 24P record and output their video and time code at 29.97. The popular Panasonic SDX-900 can shoot at 24P, but the camera adds 3-2 pulldown to the video signal before it’s recorded to tape or output. The result is NTSC compatible video and time code that must be captured to a 29.97 timeline. 29.97 and 23.976 time code are two different formats that are not compatible with each other. If you’re shooting with a Sony Cine-Alta HD-Cam camera and you plan to switch between 29.97 and 23.976, you should switch tapes at the time of the speed change. You will also need a different sequence and different capture presets in Final Cut Pro. FCP will not allow you to capture video 29.97 video and time code with 23.976 settings. After a shoot is complete, Przyborski edits on a different FCP based edit system. Using Apple’s “Compressor” application, we create HD compressed files in the 1080p DVC-Pro format. Compressor, also located on the file server, copies then compresses each file assigning a suffix to the original file names. As in the earlier example, we have the non-compressed video file, “AZO-106a-TK07” and a new, compressed version for offline editing, “AZO-106a-TK07-DVCHD.” Compressor lets you create a “droplet” that does all the work. You simply select your original captured video files and drag them to the droplet. Within a few seconds, compressor is hard at work creating new offline versions that are a fraction of the original file size. The video file server creates these files without any operator intervention. During the offline edit, the compressed video looks great and most clients aren’t aware that they’re not watching the original HD. After the offline is approved, it’s easy to conform the non-compressed video since the original files have exactly the same time code and most of the same file name. The following screen grabs are from FCP 5.1.4 using a Blackmagic Designs’ Decklink HD Pro video card and Decklink version 6.0 software. Camera is a Sony F900R at 1080P @ 23.976 fps. Please note that the author of this article, Glenn Przyborski is an award winning, director/ cinematographer . Przyborski is also an inventor with patents in the field of 24P video. Those patents are currently licensed to Sony, Panasonic, Canon and others. His website is www.przyborski.com.
| ||||||||||||||||||||||||||||||||||||||||||||||||||||||||||||||||||||||||||||||||||||||||||||||||||||||||||||||||||
Copyright © 2006
Adrienne Electronics Corporation
|